
While putting this album together I have had to pull out some Photoshop techniques and tricks that I haven’t used in a long while. Lately I just use the photos I shoot without too much alteration, but I really felt that some of the photos I most liked from their wedding had distracting backgrounds. So, since I had to relearn and practice some techniques, I thought I’d share here.

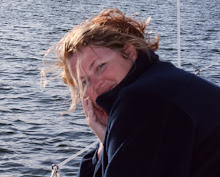
Here is an example of an original photo I was working with. I loved the emotion this photo expressed, but felt the background was totally distracting. So here is what I did to change the background.
Just remember…I am not a Photoshop expert. Nope, not me! I just play around and sometimes google or search the help menu in Photoshop, but generally I just figure it out by trial and error. These steps are for PS3 but I think they can be used in Elements (not sure).
I decided to use a ghostbones texture for the background. It looks pretty bold here but I only used a small size of this photo and it seems to work. So here we go... DUPLICATE your background layer by right clicking your background layer. I never work on the original background layer… just in case I make a mistake or don’t like the outcome. Not like that happens or anything :) Now go ahead and make a new layer by clicking on the little square block on the bottom right hand side of your layers panel. Next, fill the layer with a colour if you like (I used white). You may wish to leave your background a solid colour of your choice.

If you’re using a digital background (as I’m using a texture) open up the file and then drag it onto your document. This will be on top of your photo, but don’t worry…click on your duplicate photo layer where you want to remove the distracting background. Now go ahead and remove the background you don’t like either by using the magnetic lasso tool, the lasso tool, the eraser, etc. I used the extraction tool on this one as I had hair and fuzzy edges I wanted to keep. If you’ve never used the extraction filter give it a try:
Filter > Extract / Magnifying glass (zoom in)
Select highlighter pen (left top) and trace around object (check smart highlighting for objects with fairly defined edge (not hair).
Eraser tool – click if you make a mistake
Create highlight over border between object and background. When selection is complete ALT CLICK magnifying tool to zoom back out.
Select paint bucket and fill in. / Click PREVIEW button.
Use clean-up tools to fix up (1st one erases object – alt. brush brings back image / 2nd tool – edge clean-up for fuzzy edges – brush along edge. PS sharpens by adding in pixels to maker edges solid. ALT CLICK brings back image. Go around all edges with manual cleanup.
When done, click OK.
Now, let’s make your photo realistic – like it belongs on the background.
Finish adjustments on your subject photo and move subject onto background if it’s not already there. COPY background and move layer on top of subject layer.
FILTER>BLUR>average on that layer. This takes colours and combines them. > drop opacity way down i.e. 5%. This will balance out colours of entire portrait so the subject looks like it was standing in front of the background.
NEXT: look closely at the edge of your extraction. Does it look harsh? If so, reload selection by CTRL CLICKing on the thumbnail in the layers pallet. Once you have the “marching ants”…
MODIFY SELECTION: SELECT>MODIFY>CONTRACT 1-2 pixels
INVERT (control shift i) then control j
Apply GAUSSIAN BLUR to outline layer 1-2 pixels to soften the edge. (filter>blur>Gaussian blur)

Hope any one of the above hints will give a hand to someone who would like to remove a distracting background.


Post a Comment